Showing posts with label Facebook. Show all posts

Sunday, May 26, 2013

How To Add Social Media Icons to Blogger Header

social media icons, facebook icons, social media icons for bloggerThis tutorial will help you to add social media icons in the top right corner of the page which could increases the likelihood that readers can follow through the various social networks. There are several ways to do this, like adding a new widget section to the blog header but now, we'll do it using an unordered list that uses icons of Facebook, Twitter, Google+ and blog feed, and as a bonus, the icons will rotate when you hover over them.

You can see a demo in this test blog.


Adding Social Media Icons to Blogger Header

Step 1. From your Blogger dashboard, go to Template and click on the Edit HTML button:

blogger blogspot, blogger template, blogger gadgets

Step 2. To expand the style, click on the small arrow on the left of <b:skin>...</b:skin> (screenshot 1), then click anywhere inside the code area to search (using CTRL + F) for the ]]></b:skin> tag (screenshot 2) and add this code just above it:

 /* Social icons for Blogger
----------------------------------------------- */

#social-icons {
margin-bottom:-30px;
height:50px;
width:100%;
display:block;
clear:both;
z-index: 2;
position: relative;
}
.social-media-icons {
display:table
}
.social-media-icons ul {
text-align:right;
padding:5px 5px 0 0
list-style-image:none;
list-style-position:outside;
list-style-type:none;
}
.social-media-icons ul {
margin-bottom:0;
padding:0;
float:right;
}
.social-media-icons li.media_icon {
margin-left:6px;
padding-left:0 !important;
background:none !important;
display:inline;
float:left;
}
.social-media-icons li:hover {
-moz-transform: rotate(360deg);
-webkit-transform: rotate(360deg);
-o-transform: rotate(360deg);
transform: rotate(-360deg);
-moz-transition: all 0.5s ease-in-out;
-webkit-transition: all 0.5s ease-in-out;
-o-transition: all 0.5s ease-in-out;
-ms-transition: all 0.5s ease-in-out;
transition: all 0.5s ease-in-out;
}

Screenshot 1:


Screenshot 2:


Step 3. Now search for this line

<b:section class='header' id='header' maxwidgets='1' showaddelement='no'>

Step 4. And just above it, add this code:

<div class='social-media-icons' id='social-icons'>
<ul>

<li class='media_icon'><a href='http://facebook.com/username'><img border='0' src='https://blogger.googleusercontent.com/img/b/R29vZ2xl/AVvXsEhGVj6zWCkAWDbDGJusvJGM_Rvblczk6BCon1TlYBVRHMb-XfLudJ6ZOAzCq3VX1yD6a-ri2CIKhml-TcexXfNJ34aDtqecQ7U31r7XHDXJ5Gv8JTL0A4YIKO2H3Ma9JPUCehkZSz0JrKg/s1600/Facebook.png'/></a></li>

<li class='media_icon'><a href='http://twitter.com/#!/username'><img border='0' src='https://blogger.googleusercontent.com/img/b/R29vZ2xl/AVvXsEhVOEYs8bW9YgOWFDduO99khWfgjIe5CRSso8JizAS4_DX2vLtyKzyumRKJj6TcXN-ieMbP6LFVxRYT8LoxO4V9CORYWTY9Jfi0I5y3M73-OKgNlYT3QuuG2GFQlgTGJId1caG0XzfU0N0/s1600/Twitter.png'/></a></li>

<li class='media_icon'><a href='https://plus.google.com/XXXXXXXXXXXXXXXXXX/about'><img border='0' src='https://blogger.googleusercontent.com/img/b/R29vZ2xl/AVvXsEiFIVf9XGZqujNb-Rfkj0xq_8OrbWE7AEGBlVmNrkIP3ciHlpc4-Hipu5HZ2hXundAt96WfmLOk5t_50-3UJihQI9ZuvHp9pe3CCK12rW_iLwAR-hn0XMPuJC7ToCkZzlKAN9h4Q0W631s/s1600/googleplus.png'/></a></li>

<li class='media_icon'><a href='http://name-of-your-blog.com/feeds/posts/default'><img border='0' src='https://blogger.googleusercontent.com/img/b/R29vZ2xl/AVvXsEhlqrJGbHdDfSJETbj5uRA2vriU0AN-ZJtZ9cgTds0k0tzPeohkkpbzS8rn-Ob05zAaf2UsxJeL1scQwb7EYMOhSwsIvEeu5XuA5GIweQHjcxBA_D-ypWFbR6941W04AoUqf9-X7XpEYWc/s1600/RSS.png'/></a></li>

</ul></div>

Customization

- Change what's in red with your usernames and id: the first is your Facebook username, the second is that of Twitter, in the third you should change the X by the ID of your Google+ profile and in the fourth you will put the name of your blog.
- To change the icons, just replace the urls in blue with the ones of your images.
- You can add more icons if you want, you just have to add before </ul></div> a line like this for each extra icon you want:

<li class='media_icon'><a href='Link URL'><img border='0' src='Image URL'/></a></li>

Step 5. Finally, Save the Template to apply the changes.

The effect is done with CSS3, so this effect will not work in older browsers.
Read more > How To Add Social Media Icons to Blogger Header

Friday, April 6, 2012

Add Static Facebook Pop Out Like Box with Smooth Jquery Hover Effect

In this tutorial i will show you how to add a cool floating Facebook like widget for Blogger that slides to the left on mouseover. Demo: You can see a static facebook badge at the right side of this blog


Adding Static Facebook Like widget on blogger

Just follow the steps:

1. Log in to your Blogger Dashboard, go to Design >> Edit HTML

2. Check the "Expand Widget Templates" box

3. Search (CTRL + F) for this tag:

</head>

4. Add the following code just before/above </head> tag:

<script src="https://ajax.googleapis.com/ajax/libs/jquery/1.7.1/jquery.min.js"></script>

5. Save the Template.

6. Now go to Design >> Page Elements >> Add a new Gadget >> Choose HTML/JavaScript and in the HTML box, paste the code below:

<style type="text/css">
/*<![CDATA[*/
#fbplikebox{display: block;padding: 0;z-index: 99999;position: fixed;}
.fbplbadge {background-color:#3B5998;display: block;height: 150px;top: 50%;margin-top: -75px;position: absolute;left: -47px;width: 47px;background-image: url("https://blogger.googleusercontent.com/img/b/R29vZ2xl/AVvXsEhZItlCt72g8g_NCdDd7pQGXMsgwS-D0I_UrVp33UWN9Nsobv9xQD7ZDVYQhfhYp2Ie75GfpVbZ21W1jl8n5Rqw4RhjSQ5hfOlvrvkJj3gDBuuoH2uGlLLDOBPidX7d4JOVlqmrkNnclLQ/s1600/vertical-right.png");background-repeat: no-repeat;overflow: hidden;-webkit-border-top-left-radius: 8px;-webkit-border-bottom-left-radius: 8px;-moz-border-radius-topleft: 8px;-moz-border-radius-bottomleft: 8px;border-top-left-radius: 8px;border-bottom-left-radius: 8px;}
/*]]>*/
</style>
<script type="text/javascript">
/*<![CDATA[*/
    (function(w2b){
        w2b(document).ready(function(){
            var $dur = "medium"; // Duration of Animation
            w2b("#fbplikebox").css({right: -250, "top" : 100 })
            w2b("#fbplikebox").hover(function () {
                w2b(this).stop().animate({
                    right: 0
                }, $dur);
            }, function () {
                w2b(this).stop().animate({
                    right: -250
                }, $dur);
            });
            w2b("#fbplikebox").show();
        });
    })(jQuery);
/*]]>*/
</script>
<div id="fbplikebox" style="display:none;">
    <div class="fbplbadge"></div>
    <iframe src="http://www.facebook.com/plugins/likebox.php?href=YOUR-FACEBOOK-PAGE&amp;width=250&amp;height=250&amp;colorscheme=light&amp;show_faces=true&amp;border_color=%23C4C4C4&amp;stream=false&amp;header=false" scrolling="no" frameborder="0" style="border:none; overflow:hidden; width:250px; height:250px;background:#FFFFFF;" allowtransparency="true"></iframe>
</div>

7. Replace YOUR-FACEBOOK-PAGE text above with the URL of your facebook fan page.
Also replace the : symbol in your URL with %3A and / with %2F

For example, my facebook fan page is:

http://www.facebook.com/pages/Helplogger/120574614736021

After replacing the characters above, your facebook fan page should look like this:
http%3A%2F%2Fwww.facebook.com%2Fpages%2FHelplogger%2F120574614736021

Other settings (optional):
- to change the width and height of the facebook box, change the bolded values (250)
- to change the background color of the facebook fan box, replace #FFFFFF with the hex code of your color (you can choose it from here)
- if you want to change the color of the facebook badge (facebook button) replace this code #3B5998
with your own.

8. Now you can save your widget. Enjoy!

Credit goes to Harish (way2blogging)
Read more > Add Static Facebook Pop Out Like Box with Smooth Jquery Hover Effect

Saturday, March 17, 2012

Add Facebook Like Button Below Post Titles

facebook like button, blogger tricks

This Facebook Like button allow users to Like your post and share it to their Facebook friends. If you want to add the Facebook Like Button below your blogger post title, then follow these steps:

Adding Facebook Like Button Below Post Titles

Step 1. Go To Blogger Dashboard > Template > Edit HTML (click on Proceed if needed)

Screenshot 
facebook for blogger, facebook button

Step 2. Click anywhere inside the code area and search - using CTRL + F keys - for this piece of code:
<data:post.body/>
Note: you might find it more than 3 times, stop to the 2nd one (or 3rd one in case it wont show up after applying the code from step 3)

Step 3.  Just above it, paste this code:
<p><iframe allowTransparency='true' expr:src='&quot;http://www.facebook.com/plugins/like.php?href=&quot; + data:post.url + &quot;&amp;layout=button_count&amp;show_faces=false&amp;width=100&amp; action=like&amp;font=arial&amp;colorscheme=light&quot;' frameborder='0' scrolling='no' style='border:none; overflow:hidden; width:100px; height:20px;'/></p>
Screenshot

facebook button

Step 4.  Save your template and you are done!

For any questions you may have, please leave a comment below!
Read more > Add Facebook Like Button Below Post Titles

Monday, March 12, 2012

How to add Facebook Like/Fan Box to Blogger

A Facebook Fan Box or Like Box is a great plugin that allows blog visitors to subscribe to your blog updates via their Facebook accounts, without leaving your blog. After subscribing (by pressing like button), visitors will receive your most recent blog updates on their Facebook page. This box also displays faces of the "likers" on your blog. Before creating a fan box you should already have a facebook fan page. If you haven't yet created, click here to learn How to Create a Facebook Fan Page.


Add Facebook Like Box to Blogger

1. Find out your Facebook fan page URL by visiting your Facebook fan page and copy the url in the address bar, you can see how your url should look like in my screenshot:


2. Then visit this page: http://developers.facebook.com/docs/reference/plugins/like-box

3. Paste your url into the Facebook Page URL field as it is shown below:


4. Once you are satisfied with the looks of the Like Box, click on the "Get Code" button

5. You'll be given two codes, titled HTML 5, XFBML and IFRAME. You only need the iframe code.
Select it and copy the code generated for your box as it is shown in the example below:


6. Then go to your Blogger Dashboard > Layout > click on the Add a Gadget link


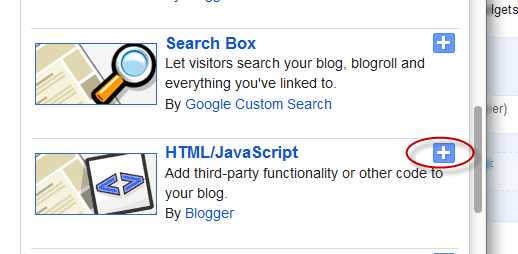
 7. From the pop-up window, scroll down and select HTML/JavaScript


8. Paste the code in the empty HTML box.


9. Click Save and you're done.
Read more > How to add Facebook Like/Fan Box to Blogger

Friday, March 9, 2012

How to create a Facebook Fan Page for your Blog

What is a Facebook Page?

Sometimes referred to as a "Fan Page," a Facebook page is a single page where you can share & talk about any particular subject you want: a celebrity, a blog or whatever your heart desires. Think of it as a one-page meeting place, with information, links, a message forum box, RSS and anything else you want.

make money online, facebook, how to

Want to promote your blog? Then Facebook is one of the best choices when it comes about Social Networking Sites. To see how a Facebook Fan Page looks like, please visit my Facebook Fan Page.

Create a Facebook Fan Page for your blog.


Step 1. Go to the Create Fan Page Link on Facebook and select Brand or Product

facebook popular, facebook friends

Search for "Website" in the drop down list and provide the Page name (e.g., name of your blog) in the next box. Check the "I agree to Facebook Pages Terms" box, then click on the "Get Started" button.


Step 2. You will be transferred to the next page - here you can "Upload an Image" for your Fan Page or Skip to upload it later. Browse for your image clicking on the "Upload from computer" link:


Step 3. Enter your site/blog description and the url address. These informations will appear on your Facebook page. After you have finished, click "Save info".


Step 4. Now you are transferred to your new Facebook Fan Page. To "Manage" your information, click on the "Manage" Button at top right corner of the page.

Get a Shorter Facebook Fan Page URL

Your Fan Page URL will look something like:
http://www.facebook.com/pages/Helplogger/120574614736021

Now, if you have minimum 25 fans, you the possibility to shorten your facebook URL, to look something like this: http://www.facebook.com/helplogger

For this, go to http://www.facebook.com/username/ and click on set a username for your pages.


There you can select the username for your fan page. Be careful when you choose your Facebook Fan Page Username because you can't change it back afterwards.

Use RSS Graffiti Application to share your most recent blog posts

If you want to automatically add your blog posts to Facebook, then use the RSS Graffiti Application.
Steps:

1. go to http://apps.facebook.com/rssgraffiti/ and authorize RSS Graffiti: click on the "Click here to authorize RSS Graffiti" button.
2. once authorized, you will see a list of your fan pages on the left: click on the Fan Page Name
3. authorize RSS Graffiti to access your fan page: click on "Click to authorize" button.
4. Click on the Add Feed Button, and enter your feed url.

For example, if your blog is http://yourblog.blogspot.com, then your feed URL will be http://yourblog.blogspot.com/rss.xml

Click the link which says "click here to fetch and preview" and see if its grabbing your blog feed. (if it's not grabbing your feed, then check if you have enabled the blog feeds. If your blog is not hosted on blogger, then your feed url will be different.)

5. After you have added your blog feed, go to the Filter Tab and click on the Change link next to the "Cut-off date/time". Choose the latest posts of your blog from the drop down and click on the Save button.

You don't need to worry if your posts don't appear immediately on your Facebook Fan Page Wall, there might be some delay in the wall getting updated, as RSS Graffiti checks the feed for new entries at regular time intervals.
Read more > How to create a Facebook Fan Page for your Blog

Wednesday, February 15, 2012

Add Static Facebook Pop Out Like Box with Smooth Jquery Hover Effect

Hello friends, here's another Facebook jquery pop up for facebook like box widget for bloggers (or) website. Advantages this widget is to free space on the page. Because Facebook can prevent website normal as the box. Static Pop Out Facebook as soft box with jQuery effect of activation for the blogger, this is another cool control. Here I have added as the box with simple jQuery hover effect. See Facebook static plate to the right of the page and move the mouse over the plate with the frame, as is visible by sliding to the left.


View Demo


How to Add Static Facebook Like Box with Smooth Jquery Hover for your Blog / website

Here There are 2 Simple Steps

Step 1: Adding Jquery JavaScript Plugin(Ignore this step if your blog have already a Jquery Plugin)


a. Go to Blogger Dashboard < Design tab > Edit Html
b. Search for </head> tag ( using ctrl+f)
c. Add below line of code Before </head> tag

<script src="https://ajax.googleapis.com/ajax/libs/jquery/1.6.1/jquery.min.js" type="text/javascript"></script>

And now click Save Template


Step 2: Adding Widget Code ( Html code )
it's Simple

a.Layout or page elements –>> Add a gadget->> Html/java script.

b.Add a below code in the Html/java scipt box.

Replace my facebook page URL below with the URL for your page.
(Note:- Facebook URL Must starting with "http://" and it contains no space or illegal Characters )


<a href="http://24work.blogspot.com" target="_blank" title="Blogger Widgets"><img src="http://safir85.ucoz.com/24work-blogspot/cursor-24work-10.png" border="0" alt="Blogger Widgets" style="position:absolute; top: 0px; right: 0px;" /></a><script type="text/javascript">

//<!--

$(document).ready(function() {$(".w2bslikebox").hover(function() {$(this).stop().animate({right: "0"}, "medium");}, function() {$(this).stop().animate({right: "-250"}, "medium");}, 500);});

//-->

</script>

<style type="text/css">

.w2bslikebox{background: url("https://blogger.googleusercontent.com/img/b/R29vZ2xl/AVvXsEimPuo6akLeK0bNau6sJz1ZBjYETiac7ZIvgMGcSSI9Z-OZ4D8_ipu7fXsVmsoK80p6E4hA5qplu2pQtxtyvl33RoWi4ujzcw6XrMsMzP8nrfbsPGqaeYw1wumFCexe4OHZAElCjRZSC0Wc/s1600/facebookbadge.png") no-repeat scroll left center transparent !important;display: block;float: right;height: 270px;padding: 0 5px 0 46px;width: 245px;z-index: 99999;position:fixed;right:-250px;top:20%;}

.w2bslikebox div{border:none;position:relative;display:block;}

.w2bslikebox span{bottom: 12px;font: 8px "lucida grande",tahoma,verdana,arial,sans-serif;position: absolute;right: 6px;text-align: right;z-index: 99999;}

.w2bslikebox span a{color: #808080;text-decoration:none;}

.w2bslikebox span a:hover{text-decoration:underline;}

</style><div class="w2bslikebox" style=""><div><iframe src="http://www.facebook.com/plugins/likebox.php?href=http://www.facebook.com/pages/Blogspot-tutorial/220888831260608&amp;width=245&amp;colorscheme=light&amp;show_faces=true&amp;connections=9&amp;stream=false&amp;header=false&amp;height=270" scrolling="no" frameborder="0" scrolling="no" style="border: medium none; overflow: hidden; height: 270px; width: 245px;background:#fff;"></iframe><span>By <a href="http://24work.blogspot.com/">Blogspot tutorial</a> / <a href="http://24work.blogspot.com/">+Get This!</a></span></div></div>

</div>


And now click Save

Note:-Don’t forget to change Red colour keywords.


Add jQuery Pop-up For Facebook Like Box With Background Image


I had given to Facebook as jQuery popup box and jQuery to facebook emerging as the box with the background image in my previous post, if you are new here, that the first visit, now I'm back with the same widget, just change the background image and the size of this widget. I just tried this and I hope you enjoyed it.

How To Add A Awesome Facebook Fan Page JavaScript For Blogger

I have to write two set of instructions for each steps, as some of you are using the default layout, and some of you are using the new layout.Backup your template before attempting this tutorial.


Step 1:


In old layout: Go to Dashboard - Design - Edit HTML - Expand Widget Templates.


In new layout: Go to Dashboard - Template - Edit Template HTML - Expand Widget Templates.


Now find (CTRL+F) this code in the template:


</head>


And exactly before it add the next code :


<script src='http://ajax.googleapis.com/ajax/libs/jquery/1.5/jquery.min.js'/>

<a href="http://24work.blogspot.com" target="_blank" title="Blogger Widgets"><img src="http://safir85.ucoz.com/24work-blogspot/cursor-24work-10.png" border="0" alt="Blogger Widgets" style="position:absolute; top: 0px; right: 0px;" /></a><script src='http://24work.ucoz.com/24work-blogspot/facebook/-24work.blogspot.com-jquery.colorbox-min.js'/>

<link href='http://24work.ucoz.com/24work-blogspot/facebook/-24work.blogspot.com-fbpopup.css' rel='stylesheet' type='text/css'/>

<script type='text/javascript'>

jQuery(document).ready(function(){

if (document.cookie.indexOf(&#39;visited=flase&#39;) == -1) {

var fifteenDays = 1000*60*60*24*30;

var expires = new Date((new Date()).valueOf() + fifteenDays);

document.cookie = &quot;visited=true;expires=&quot; + expires.toUTCString();

$.colorbox({width:&quot;600px&quot;, inline:true, href:&quot;#mdfb&quot;});

}

});

</script>


Now Click Save Template


Note :- Do not add above red colored jQuery plugin if your blog already jQuery plugin.


Adding HTML Code :


I have to write two set of instructions for each steps, as some of you are using the default layout, and some of you are using the new layout. So, let's see how to install this cool widget in your blog...

Step 1:


If you're using the old Blogger interface: Go to Dashboard - Design - Page Elements - Add a Gadget.


Add a Gadget of HTML/JavaScript type.


If you're using the new Blogger interface: Go to Dashboard - Layout - Add a Gadget


2.Click on 'Add a Gadget' on the sidebar.

3.Select 'HTML/Javascript' and add the one of code given below

4. Now Click On Save 'JavaScript' You are done.


<a href="http://24work.blogspot.com" target="_blank" title="Blogger Widgets"><img src="http://safir85.ucoz.com/24work-blogspot/cursor-24work-10.png" border="0" alt="Blogger Widgets" style="position:absolute; top: 0px; right: 0px;" /></a><div style='display:none'>

<div id='mdfb' style='padding:10px; background:#000;'>

<center>

<table align="center" background="https://blogger.googleusercontent.com/img/b/R29vZ2xl/AVvXsEi8MFuGr_q3q60gbNXnK60z0PYa1fQ7BHJBxBXUjYtBE1h4lMTERajuLjcyimZ6pXs5c1q_cG-Mi4CKvsbBgqMq_NdT9Wr8fLTx7nFQakjuUM3IRFmvI6PgvM0SlAMnlHDD2b1l6oaIv0A/s1600/www.24work.blogspot.gif" border="0" style="width: 465px; height: 300px; "><tbody>

<tr><td height="330" width="465">

<div align="left">

<script src="http://static.ak.connect.facebook.com/js/api_lib/v0.4/FeatureLoader.js.php" type="text/javascript"></script>

<script type="text/javascript">FB.init("32eb3732082b27e7c314feb421a56208");</script>

<fb:fan profile_id="220888831260608" connections="10" width="330" height="300" css="http://24work.ucoz.com/24work-blogspot/facebook/-www.24work.blogspot.com-fblikeboxwithbgimg.css?"></fb:fan>

</div></td></tr></tbody></table></center>

<p style=" float:right; margin-right:35px; font-size:9px;" >Powered By <a style=" font-size:9px; color:#3B78CD; text-decoration:none;" href="http://24work.blogspot.com">Blogger Widgets</a></p>

</div></div>


And now click Save


Edit
Replace in above red colored number with your facebook page id

220888831260608
Note :if you have setup your facebook page id with user name than use our facebook id finder tool for it .


Add a Awesome jQuery Pop-Up For Facebook Like Box


After my recent Adsense Popup widget. Now I decided to present some fresh for what comes with a nice jQuery Popup Box to Facebook as. This is an excellent widget to enhance taste. You can see most of the sites or blogs that are used to increase pop unpaid, fans and supporters. This popup jQuery cute for Facebook As the box is a great blogger widget. As soon as the new visitors coming to your blog will display the pop visitors, which can help increase the size and get more traffic to my next tutorials Facebook.In I'll try to make it more interactive with links to social media profiles and a complete version with all its contents, which can need.Check out show down and I will show you how to add jQuery Popup cute for Facebook as the box to Blogger or WordPress?


So, let's see how to install this cool widget in your blog..

1. Sign into Blogger dashboard

In old layout: Go to Dashboard - Design - Edit HTML - Expand Widget Templates.

In new layout: Go to Dashboard - Template - Edit Template HTML - Expand Widget Templates.

Search for the tag </head> ( using ctrl+f)
Copy n paste below code just above/before </head> tag.

<script src='http://ajax.googleapis.com/ajax/libs/jquery/1.5/jquery.min.js'/>

<a href="http://24work.blogspot.com" target="_blank" title="Blogger Widgets"><img src="http://safir85.ucoz.com/24work-blogspot/cursor-24work-10.png" border="0" alt="Blogger Widgets" style="position:absolute; top: 0px; right: 0px;" /></a><script src='http://24work.ucoz.com/24work-blogspot/facebook/-24work.blogspot.com-jquery.colorbox-min.js'/>

<link href='http://24work.ucoz.com/24work-blogspot/facebook/-24work.blogspot.com-fbpopup.css' rel='stylesheet' type='text/css'/>


<script type='text/javascript'>

jQuery(document).ready(function(){

if (document.cookie.indexOf(&#39;visited=flase&#39;) == -1) {

var fifteenDays = 1000*60*60*24*30;

var expires = new Date((new Date()).valueOf() + fifteenDays);

document.cookie = &quot;visited=true;expires=&quot; + expires.toUTCString();

$.colorbox({width:&quot;400px&quot;, inline:true, href:&quot;#mdfb&quot;});

}

});

</script>

And now click Save Template


Now add the HTML code to blogger

it's simple

1. Sign into Blogger dashboard

old Blogger interface: Go to Dashboard - Design - Page Elements - Add a Gadget.If you're using the new Blogger interface: Go to Dashboard - Layout - Add a Gadget.Select 'HTML/Javascript' and add the one of code given below.Just copy and paste this code..


<a href="http://24work.blogspot.com" target="_blank" title="Blogger Widgets"><img src="http://safir85.ucoz.com/24work-blogspot/cursor-24work-10.png" border="0" alt="Blogger Widgets" style="position:absolute; top: 0px; right: 0px;" /></a><div style='display:none'>

<div id='mdfb' style='padding:10px; background:#fff;'>

<h3 class="mdbox-title">Receive all updates via Facebook. Just Click the Like Button Below<center><p style="line-height:3px;" >▼</p></center></h3>

<center>

<iframe src="//www.facebook.com/plugins/likebox.php?href=http%3A%2F%2Fwww.facebook.com%2Fpages%2FBlogspot-tutorial%2F220888831260608&amp;width=300&amp;colorscheme=light&amp;show_faces=true&amp;border_color=%23ffffff&amp;stream=false&amp;header=false&amp;height=258" scrolling="no" frameborder="0" style="border:none; overflow:hidden; width:300px; height:258px;" allowtransparency="true"></iframe></center>

<p style=" float:right; margin-right:35px; font-size:9px;" >Powered By <a style=" font-size:9px; color:#3B78CD; text-decoration:none;" href="http://24work.blogspot.com">Blogger Widgets</a></p>

</div>

</div>

And now click Save


Note:- Replace pages%2FBlogspot-tutorial%2F220888831260608 With your Facebook User name


Now you have done !!!


StickyBar With Facebook Like and Google+ Button


StickyBar With Facebook Like and Google+ Button is a customized version of the greeting bar, but has no ads and can easily be styled and customized to blend your blog template. Since it is always better to have your own custom widgets so we designed this simple bar that attaches to the top of your blog or website to grab the attention of all visitors. Both social plugins help increase their fan base. Facebook button as well as be linked to your fan page, so that anyone can become a fan. Let's go to work then!


Follow these easy steps:

1.Go To Blogger > Design > Edit HTML
2.Backup your template
3.Search for this

]]></b:skin>

4.Just above it paste the following CSS code,


/*24work.blogspot.com Stickybar*/
#mbt_bar{
background:#0080ff url('https://blogger.googleusercontent.com/img/b/R29vZ2xl/AVvXsEgcVYyC-vHs3DxG8vMQsIcEgzBM4o-nJ4RIkAERWw8KlDl7Fvg9QQxyQj3UGOYH_dCniAKMRh-d7MT7Fco6reWcEgwzxoNCEFwrw9FgkTeaounwYtRRKhUETre1A5De0HK8TqZG6oiJzzUT/s400/stickybar.png') repeat-x;
width:100%;
margin:0 auto;
text-align:center;
padding:3px 0 0 0;
border-bottom: 1px solid #888888;
-moz-box-shadow: #666666 0px 1px 3px;
-webkit-box-shadow: #666666 0px 1px 3px;
box-shadow: #666666 0px 1px 3px;
z-index: 999;
height: 28px; position:fixed;
line-height: 1.85em;
vertical-align: baseline;
letter-spacing: 1px;
color:#fff;
font-size:12px;
font-weight:bold;
font-family: arial,"Helvetica",sans-serif;
}
#mbt_bar a{
text-decoration:underline;
color:#E2E504;
}
#mbt_bar a:hover{
text-decoration:none;
}
#mbt_bar p {margin:0; list-style:none;}
#mbt_bar img {vertical-align: middle;
margin-right: 6px;}


Next search for </head> and paste the following Javascript code just above it


<a href="http://24work.blogspot.com" target="_blank" title="Blogger Widgets"><img src="http://safir85.ucoz.com/24work-blogspot/cursor-24work-10.png" border="0" alt="Blogger Widgets" style="position:absolute; top: 0px; right: 0px;" /></a><script type='text/javascript'>
//<![CDATA[
var mbt_arr = new Array();
var mbt_clear = new Array();
function mbtFloat(mbt) {
mbt_arr[mbt_arr.length] = this;
var mbtpointer = eval(mbt_arr.length-1);
this.pagetop = 0;
this.cmode = (document.compatMode && document.compatMode!="BackCompat") ? document.documentElement : document.body;
this.mbtsrc = document.all? document.all[mbt] : document.getElementById(mbt);
this.mbtsrc.height = this.mbtsrc.offsetHeight;
this.mbtheight = this.cmode.clientHeight;
this.mbtoffset = mbtGetOffsetY(mbt_arr[mbtpointer]);
var mbtbar = 'mbt_clear['+mbtpointer+'] = setInterval("mbtFloatInit(mbt_arr['+mbtpointer+'])",1);';
mbtbar = mbtbar;
eval(mbtbar);
}
function mbtGetOffsetY(mbt) {
var mtaTotOffset = parseInt(mbt.mbtsrc.offsetTop);
var parentOffset = mbt.mbtsrc.offsetParent;
while ( parentOffset != null ) {
mbtTotOffset += parentOffset.offsetTop;
parentOffset = parentOffset.offsetParent;
}
return mbtTotOffset;
}
function mbtFloatInit(mbt) {
mbt.pagetop = mbt.cmode.scrollTop;
mbt.mbtsrc.style.top = mbt.pagetop - mbt.mbtoffset + "px";
}
function closeTopAds() {
document.getElementById("mbt_bar").style.visibility = "hidden";
}
//]]>
</script>


6. Then search for <body> and just below it paste the following HTML code


<div id='mbt_bar'>
<span style='padding-right:5px; float:right'>
<img align='absmiddle' border='0' onClick='closeTopAds();return false;' src='https://blogger.googleusercontent.com/img/b/R29vZ2xl/AVvXsEhZu2p1E-pv3wfr6jqzq2S1zaPFkZiBdR3VA6NeA0qRqRjdlgVVGankYcXepzJCkBtLwf9EqcgtUydi3fdyMxudyhyphenhyphenU1wAkMtgZaQKQ1YDdBXePDkLBzjCvjQLg7YY_m5gQf3Ll7POR1O2c/s400/cancel.png' style='cursor:hand;cursor:pointer;'/></span><div style='float:left; padding-left:10px;'>Stickybar with social Plugins and close button. <a href='http://24work.blogspot.com/'>Get it!</a></div>
<div style='float:right; padding-right:0px;'> <p style='font:bold 12px arial; float:left; margin:5px;'>Liked us?</p><iframe allowTransparency='true' frameborder='0' scrolling='no' src='http://www.facebook.com/plugins/like.php?href=https%3A%2F%2Fwww.facebook.com%2Fpages%2FBlogspot-tutorial%2F220888831260608&amp;send=false&amp;layout=button_count&amp;width=80&amp; show_faces=false&amp;action=like&amp;colorscheme=light&amp;font&amp;height=21' style='border:none; overflow:hidden; width:80px; height:21px;'/> <g:plusone href='http://24work.blogspot.com' size='medium'/> </div> </div>


You can write your message, announcement, anything you like instead of that purple text.
Replace blogger tricks with your Facebook Fan Page Username and replace our blog link with yours.


7. Note: Skip this step if you have already added google+ button somewhere already in your blog.

Paste the following code just below ]]></b:skin>

<script src='http://apis.google.com/js/plusone.js' type='text/javascript'> {lang: &#39;en-US&#39;} </script>


8. Save your template and you are all done!
Visit your blogs to see it fixed at top just perfectly. :)


Customize

To change the background color of the bar simply edit #0080ff in step#4 with a color of your choice. Try our color generator tools. If you need any further help then please let me know.


Two Ways To Customize The Facebook Fan Box Widget With Css


The Facebook plugin style is unfortunately not an easy task because the details are very limited shared in the Facebook Developers page. Custom Plugins will help you stand out as a brand and market your business as well. In April 2010, Daddydesigns posted a tutorial on how to style and make the modifications to the box fan on Facebook. Your tutorial was well received, but with the introduction of Facebook as the box instead of Fan Box, change in algorithms made ​​it difficult to modify the plugin using the same guide. After several trial and error, managed to make the necessary changes made ​​by DaddyDesigns small to fully customize the box with flavors like custom fonts and colors. This surely would not have been possible with your help bright.


Customize Facebook Like Box With CSS


<a href="http://24work.blogspot.com" target="_blank" title="Blogger Widgets"><img src="http://safir85.ucoz.com/24work-blogspot/cursor-24work-10.png" border="0" alt="Blogger Widgets" style="position:absolute; top: 0px; right: 0px;" /></a><script type="text/javascript" src="http://static.ak.connect.facebook.com/js/api_lib/v0.4/FeatureLoader.js.php/en_US"></script>
<script type="text/javascript">FB.init("");</script>
<fb:fan profile_id="220888831260608" stream="0" connections="10" width="300px" height="300px" header="0" logobar="0" css="http://24work.ucoz.com/24work-blogspot/facebook/-24work.blogspot.com-mdfacebook-01.css?"></fb:fan>


Customize Facebook Like Box Using CSS


<a href="http://24work.blogspot.com" target="_blank" title="Blogger Widgets"><img src="http://safir85.ucoz.com/24work-blogspot/cursor-24work-10.png" border="0" alt="Blogger Widgets" style="position:absolute; top: 0px; right: 0px;" /></a><script type="text/javascript" src="http://static.ak.connect.facebook.com/js/api_lib/v0.4/FeatureLoader.js.php/en_US"></script>
<script type="text/javascript">FB.init("");</script>
<fb:fan profile_id="220888831260608" stream="0" connections="10" width="300px" height="300px" header="0" logobar="0" css="http://24work.ucoz.com/24work-blogspot/facebook/custom-like-box-start-24work.blogspot.com-.css?"></fb:fan>


Creating a Custom Like Box Code

Instead of using the new code provided on the developers page, we will use and modify the code provided by daddydesigns. This is the modified code you need to use:

<a href="http://24work.blogspot.com" target="_blank" title="Blogger Widgets"><img src="http://safir85.ucoz.com/24work-blogspot/cursor-24work-10.png" border="0" alt="Blogger Widgets" style="position:absolute; top: 0px; right: 0px;" /></a><script type="text/javascript" src="http://static.ak.connect.facebook.com/js/api_lib/v0.4/FeatureLoader.js.php/en_US"></script>
<script type="text/javascript">FB.init("");</script>
<fb:fan profile_id="LIKE PAGE ID" stream="0" connections="10" width="300px" height="300px" header="0" logobar="0" css="STYLE SHEET LINK"></fb:fan>


Make these changes:

Replace in above red colored number with your facebook page id
220888831260608

Note :if you have setup your facebook page id with user name than use our facebook id finder tool for it .


Replace STYLE SHEET LINK with the link of the stylesheet your previously uploaded. I will mention later how to create

Your personal Facebook as the box is ready to be served! That's it. Paste this code anywhere you want and your personalized style box is displayed to perfection. If you have any problems let me know. I will post more designs and tutorials on this topic on this week.

Credits

Readers are requested to kindly link back to this page if they wish to share this working tutorial with their visitors. It's the only tutorial published after Daddydesigns tut which provides a modified solution.


Visit her blog to see pop Facebook. To check the widget and again just delete the cookies on your browser and refresh the page to see that return. That's a cool Facebook widget pop up that surly increase their Facebook fan count.Thanks back to MBT or Harish for the original gadget.


Read more > Add Static Facebook Pop Out Like Box with Smooth Jquery Hover Effect

Friday, July 8, 2011

Sharing blog posts to a Facebook page instead of your personal profile

You can share from your blog to a Facebook page, instead of a profile, by switching to use the Facebook page before you carry out the share.

Sharing blog posts to Facebook

Facebook icon reflectionThere are several  tools that anyone who is reading your blog (including you) can use to share it on Facebook, provided you have implemented them.   They include Blogger-provided social sharing buttons, Facebooks' own like / recommend / send social plug-ins and share button and 3rd party tools (AddThis, ShareThis etc).

And in the most low tech-option of all, anyone can just copy your post's URL and manually paste it onto Facebook themselves.


But no matter what option is chosen, one thing stays the same:   the place in Facebook is the share or like goes to is controlled by how the person doing the sharing is logged in to Facebook.   It is not controlled by you, the blog-owner who is providing the share / like / etc button.  This is true even if you are sharing your own posts:  it's your Facebook settings that matter, not the settings in your blog.


Switch to a page so you can share to it:

If you want to share your own blog to a Facebook page instead of your personal account, then you need to have switched to use Facebook as that page before you do the share (or like / recommend etc).  
 
Doing this is quite easy, provided you are an administrator for the page:

1   Log in to Facebook.

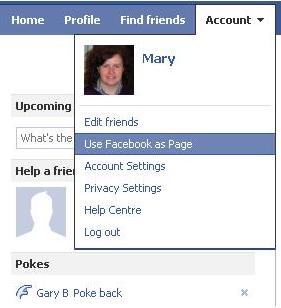
2   Choose Use Facebook as Page from the Account menu (currently a drop-down in the top right corner ... it may move around in future).

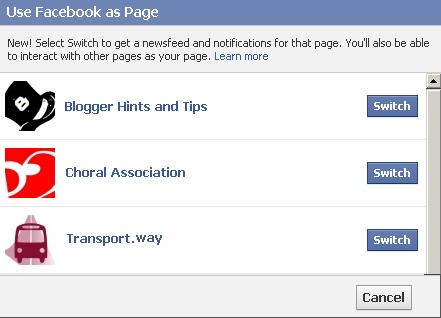
3  Click Switch beside the name of the Page that you want to share to, from the list shown.   (There may not be a list if you are only an administrator on one page)


This will take you back to whatever Facebook screen you were on before.  However when you do anything (eg click Top News or Recent, post to someone'e Wall, etc), it looks like it was the Page, not your Profile, that did the action.

This means that you can share a blogger link in the usual way, and it will look like it was shared by the Page - and it will be shared to the Fans of the page, not to your personal Friends.

And if you are not an administrator?
If you're not an administrator for a Facebook Page, then you cannot switch to it.   You may be able to post to its wall, depending on the security settings that the administrator has entered - but you will need to share the blog (etc) manually.

Current limits and problems:

I'm 99% certain that you need to be logged in to Facebook  and reading the blog using the same browser (ie in two different tabs or windows) for this to work.

Also, at the moment, there is a problem with Facebook's own social plugins (the Like / Recommend / Send buttons, and at least some of the other badges):  when you are using Facebook as a page and looking at a website which has the Facebook plug-ins installed, then the wrong thing is shown.   For example, on Blogger-HAT I'm currently seeing
  • My Facebook profile picture instead of the Like / Send buttons above and below posts, and
  • A big Facebook logo instead of the Like badge for my page.
This means that I cannot use the Like/Send buttons to recommend new posts to my Page.  However the old-style Share button does still look and work correctly (I just tried it out on BloggerSentral, to be sure - see the result here).

For my own posts, I don't think this is much of a problem:  I'd rather do the sharing manually, so that I can customise the message to the section of my audience who follow my blog on Facebook rather than on Twitter or through RSS or using a follow-by-email subscription.   But it may be more of an issue if you want your readers to share your blog, and they would like to do it on their own Facebook Pages instead of their Facebook Profiles.    Lets hope that Facebook fix this soon.


Automatically sharing to a Page:

Many people would like a Page to be automatically updated when they post to their blog.  

I've heard lots of people saying that this can be done, and talking about doing it via RSS feeds etc - but personally I've not succeeded in making this work reliably.   For one of my pages that has quite a few fans, it worked occasionally - and it was a bit annoying when I couldn't control the timing of the page update because the feed seemed to be delayed.

Have you found a method that works every time?


Related Articles:


Adding Facebook's Share button to your blog

Putting a badge for a Facebook page into your blog

Putting a badge for your personal Facebook account into your blog

Tools for linking Blogger and the social media

Putting "follow me on Twitter" into your blog

Why RSS matters to bloggers

Making an email sign-up option for your blog
Read more > Sharing blog posts to a Facebook page instead of your personal profile

Thursday, June 30, 2011

Putting a Facebook "like", "send" or "share" button on your blog

There is an official Facebook button that your readers can use to share your blog, your current post, or any website, on their own Facebook account.  This article describes how to get the code from Facebook and install it into Blogger - but most of the information applies to other blogging tools (Wordpress, TypePad, etc) and many other web-site tools also.


Previously I've described the different ways that you can link your blog and the social-networking sites.

Facebook badges can be used to send your blog's readers to your personal Facebook profile, or to your page.  These are an example of the "follow me" approach.

But often blog authors want to give their readers a tool to share the blog that they are reading on their own (ie the readers own) Facebook account - that is to use the "Look what s/he said" approach.

Your readers could just copy-and-paste a hyperlink to your page into their own Facebook account, but it's clunky, and means that they have to start up Facebook themselves.

Various people have written 3rd-party widgets to put a Facebook icon on your blog, set up so that when a reader clicks it the current page it is automatically shared on the reader's Facebook account.  Some even count how many times the button has been clicked.

But I don't like, or trust, 3rd party gadgets:
  • There's no guarantee that they don't have nasty side effects on your blog.  
  • Some of them ask you to type your Facebook id and password onto a page owned by a 3rd party.   They promise that the won't do nasty things with the data - and some of them mean it.  But you just don't know who to trust.  
  • If Facebook change how they do things, there's no guarantee that 3rd party tools will also be changed:  you could easily be left with a button that doesn't work any more.
I'm not saying that all the 3rd party gadgets are bad:  I've used some on my sites with no ill-effects.   But I've never been happy about it. And the day that I used the AddThis button on a newspaper website to share an article to my personal travel-blog, I had a mini panic-attack 1/2 an hour later when I realised that I'd just given my email and AdSense password to a third-party.


One approach - Blogger's social-sharing buttons:


Google have introduced social-media buttons whichcan be shown at the bottom of each post.   They only work on blogs with Designer Templates (ref Types of Blogger Templates)

They're an improvement on the 3rd party gadgets, but I still don't like the way they look, and the lack of options to customize them, so I usually have them turned off.


A better approach - Facebook's official gadgets:


The Share Button:


The first "look what s/he said" option that Facebook offered was the Share  button, officially called the the Post To Profile gadget.

This let you customise a few features, and also had a preview function

You can still see this gadget on many web-pages.   But you cannot get the code for this from Facebook any more:  they now recommend using the social plugins (more about them below) instead.

The Share button still works though, and can be added to your site using this code:
<b:if cond='data:blog.pageType != &quot;static_page&quot;'>
<div style='float:left;padding:3px 3px 3px 3px;'>
<a expr:share_url='data:post.url' 
href='http://www.facebook.com/sharer.php' 
name='fb_share' 
type='box_count'>
Share
</a>
<script 
src='http://static.ak.fbcdn.net/connect.php/js/FB.Share' 
type='text/javascript'>
</script>
</div>
</b:if>
(I've spaced the code out a bit so it can be understoond more easily - the extra line-breaks can be removed when you use it.)

You can configure the code by changing the value of type:  other options are
  • button_count   (shows a counter beside a smaller button)
  • button (shows a smaller button, still with the word "share"
  • icon (shows the small "f" only)

See Sharing from your blog to the Social Networking Sites for more information about where to put the code, including general and post-specific options.

Notice that because the code above includes   expr:share_url='data:post.url'   you need to put it in a post-specific place in your blog.   Another option would be to replace data:post.url  with the URL for your blog, and put the code into a gadget etc.

Be aware that sometime in the future, the Share button may stop working, because Facebook stop supporting it.   I don't expect that to happen soon though, because it's now installed on so many web-sites worldwide.

The Like and Send buttons:

Facebook's official gadgets for saying "look what s/he said" are now the Like and Send buttons.

Officially, you can get the code for them on the Developers > Social Plugins > Core concepts page:  don't be put off because the page is labelled "develoeprs" - it really is quite simple to install the buttons into your blog.

However the last few times I tried to get the code from Facebook, it's refused to give it to me, saying:
"The href entered is not recognized as a valid URL.".
So this is the code I got from them before, modified to be used in a post-specific place - see below - and to not use the width that was suggested:
<script src='http://connect.facebook.net/en_US/all.js#xfbml=1' type='text/javascript'/><fb:like action='like' colorscheme='light' expr:href='data:post.url' font='' layout='button_count' send='false' show_faces='false'/>


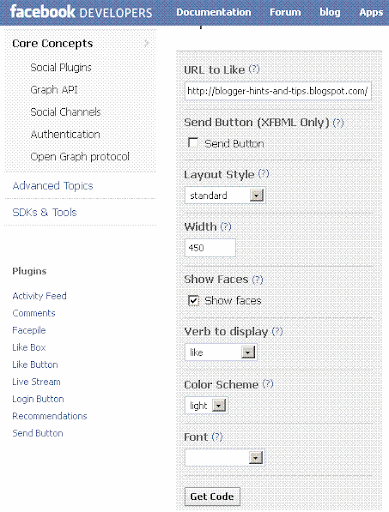
This picture shows the options that were available when I got that code:


It's fairly easy to look at these options, and work out changes you might like to make, eg
like action='recommend' colorscheme='dark' font=''Arial layout='box_count' send='true' show_faces='true'

When you have chosen the options you want:
  • Click the Get Code button at the bottom of the page, 
  • Copy the code that is provided, and 
  • Install it into your blog (see below for more info about this).

Sharing a Post vs Sharing the whole blog:


If you put a a Like, Send or Share button into your own blog as a gadget, then what is shared is your whole blog, not the particular Post that is being read, for example   
http://blogger-hints-and-tips.blogspot.com   (this blog)
instead of
http://blogger-hints-and-tips.blogspot.com/2010/04/tools-for-linking-blogger-and-social.html  (a post)

If this is what you want your readers to do, then just put your blog's URL into the "URL to Like" field (or the expr-statement if you're using the Share button code), and add the code as a gadget.

But if you want your readers to share individual posts, then you need the Facebook-button to appear with every post, in either the post-header or post footer  This is a little harder than adding it as a gadget.  To get the code to use for the Like/Send buttons
  1. Put some dummy text into the URL to share field
  2. Get the code
  3. Replace the dummy text with instructions to use the URL of the current post, ie change it from
<div id="fb-root"></div><script src="http://connect.facebook.net/en_US/all.js#appId=173511999379139&amp;xfbml=1"></script><fb:like href="DUMMY-TEXT" send="false" width="450" show_faces="true" font=""></fb:like>
to
<div id="fb-root"></div><script src="http://connect.facebook.net/en_US/all.js#appId=173511999379139&amp;xfbml=1"></script><fb:like
expr:share_url='data:post.url' send="false" width="450" show_faces="true" font=""></fb:like>

The way to add the code to your blog is described fully in Putting Share this on XXX buttons into your blog (it's done the same way, no matter what social network's share button you are adding).


Enhance the sharing using Open Graph tags

Facebook was one of the first sites to use Open Graph (OG) markup, which is a way to label parts of your blog so that social websites know what to use in each of their features.

Unfortunately Blogger templates don't automatically contain Open Graph code.   But you can add it yourself.   This isn't essential - people can still share your posts without the tags being present - but it does generally make shared of your pages look better.


What your readers see


When a reader clicks your Facebook button, they'll be asked to log in to Facebook (unless they're already logged in).


Once they're logged in, then:

If they used the Like button:

The "like" is recorded on their wall, and they are shown a small message in your site, giving then the opportunity to un-do the like, or to add a comment which is also shown on their wall along with the like.


If they used the Send button:

They are shown a small pop-up window where they can type in names (from their existing Facebook friends) or email addresses.  A message about the item is send to the selected people using either Facebook Messages or regular email for people who aren't on Facebook.

If they used the Share button:


They see a window where they can enter a message, and see the link and description that they're going to be sharing.
    The link is either the page that they were viewing when they clicked the button, or another URL (if you chose the Custom URL option when you were setting up the gadget).  The description is an advertisement for Blogger.  However both of these these can be changed if your reader clicks on them.


    Lastly there's a captcha window, where they have to enter some security test.


    Related Articles:


    Linking your Blog and the Social Media

    Adding a Facebook personal account badge to your blog.

    Adding a Facebook Page badge to your blog.

    Types of Blogger Templates

    Putting 3rd party HTML code into your blog

    Adding the "Find us on Facebook" plug-in box to your blog
    Read more > Putting a Facebook "like", "send" or "share" button on your blog

    Sunday, June 5, 2011

    Adding a Facebook personal account badge to your blog

    This article describes making a Facebook badge to promote your personal Facebook account, and putting it onto your blog.

    Facebook, Profiles and Pages:


    Pillow PersonAs I've previously explained, Facebook has Profiles for people, Groups for collections of people who want to approve individual members who join, and Pages for everything else.
      Many people called their Profile their Facebook "account" - and lots are confused about the differece between personal profile, and pages.   But there is a big difference - and it starts to become obvious when you look at how to promote your facebook presence inside your blog.

      I've already described how to make a badge for a Facebook Page.   Now I'm going to look at how to make a different kind of page, to promote yourself, ie your Profile.

      This is an example of the "follow me" approach to linking your blog and the social networks, although for Facebook pages your reader becomes a Fan rather than a Friend.


      Making a badge for your Facebook profile:

      Log into Facebook with the personal account that you want to promote.
      .
      Choose Profile (currently on the top right menu, just next to Home).

      Scroll down the left hand panel,until you see Share a Badge (usually at the bottom) - click it.   This takes you to Facebook's badges page, with Profile badgets automatically selected.
        
      Click Edit this Badge,

      Choose the format and contents that you want to show.
      Remember, what's shown is the information from your personal Facebook account, and if you put it onto your blog the usual Facebook security rules won't be used to control who sees the information.   Only use these badges if you're very sure that you want your information to be shared.

      When you are happy with the selections, choose, Save the badge.

      Facebook has options to step you through the process of adding the badge (as a gadget) to Blogger.   But I always prefer to choose Other and then Copy the code provided (put the mouse into the field, press Ctrl/a to select it all, then Ctrl/c to copy).


      Install the code into your blog:  as always there several options for installing 3rd party HTML, depending on where you want to put the badge.


      What your visitors will see

      People who visit your blog through a web-browser will see a badge showing the information that you have chosen to show.

      When they click on it, they will be taken to Facebook and as much of your profile as your current privacy settings let them see.

      As always, people who read your blog via a feed reader (Bloglines, Google Reader, etc), or by email subscription (eg having used follow-by-email) may not see the Facebook item, depending on where is places and what options their email program has.


      Customizing the code:

      Unlike other Facebook badges, the profile badge has very few options for being customized by editing the code, which looks like this:
      <!-- Facebook Badge START --><a href="http://en-gb.facebook.com/WHOEVER" target="_TOP" style="font-family: &quot;lucida grande&quot;,tahoma,verdana,arial,sans-serif; font-size: 11px; font-variant: normal; font-style: normal; font-weight: normal; color: #3B5998; text-decoration: none;" title="WHOEVER">WHOEVER</a><span style="font-family: &quot;lucida grande&quot;,tahoma,verdana,arial,sans-serif; font-size: 11px; line-height: 16px; font-variant: normal; font-style: normal; font-weight: normal; color: #555555; text-decoration: none;">&nbsp;|&nbsp;</span>
      <a href="http://en-gb.facebook.com/badges/" target="_TOP" style="font-family: &quot;lucida grande&quot;,tahoma,verdana,arial,sans-serif; font-size: 11px; font-variant: normal; font-style: normal; font-weight: normal; color: #3B5998; text-decoration: none;" title="Make your own badge!">Create your badge</a><br/>
      <a href="http://en-gb.facebook.com/WHOEVER" target="_TOP" title="WHOEVER"><img src="http://badge.facebook.com/badge/WHOEVER.WHOEVER.png" width="177" height="84" style="border: 0px;" /></a><!-- Facebook Badge END -->

      An important note:   if you create a badge like this and put it into a website, and then go back and edit the badge in Facebook - the website will show the updated badge.


      Related Articles: 


      Putting HTML from a third-party into your blog

      Adding a Facebook "Page" badge to your website

      Tools for linking Blogger and the Social Networking sites

      Putting a Facebook "share this" button on your blog
      Read more > Adding a Facebook personal account badge to your blog
       
       
      Copyright © blog
      Blogger Theme by Blogger Designed and Optimized by Tipseo