Showing posts with label Pages. Show all posts

Friday, January 20, 2012

The Page gadget: a menu bar for your blog, with links to just about anywhere

This article shows how you can use the Pages gadget as a general purpose menu bar for your blog.

Evolution of the pages gadget 

Based on a work by latvian (evolution)
 [CC-BY-2.0], via Wikimedia Commons
When Blogger first introduced so-called "static" pages, I thought they had a lot of potential.

As I investigated, though, I came to the conclusion that they were more trouble than they were worth, so I recommended abandoning them and just using posts.   Or at least abandoning the Pages gadget - even I sometimes use a Page for things that I don't want to send out in my RSS feed, eg custom-search-engine results.

But when the September-2011 version of Blogger  was introduced, the Pages gadget got a new feature:  now, it can include links to any website URL, not just your own pages.  

This makes it a lot more versatile - even though the effect is just the same as adding a Link-list gadget and putting it into the right area of the blog-layout.


How to add general web-links to your Pages gadget.

Make sure you are using the new (ie Sept 2011) Blogger software.  
(Get to it with the "switch to updated version" link if you're not - you can always go back later with the item in the gear-wheel menu, or the link on my sidebar)

Go to the Pages tab of your blog's dashboard.

Click the drop-down arrow beside New Page:


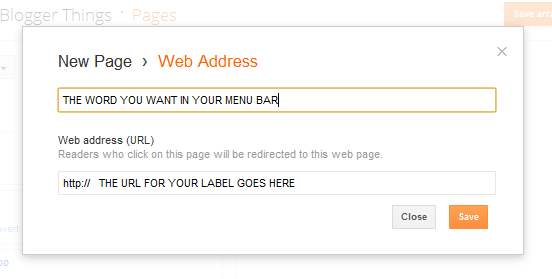
Select web-address

Enter the title that you want to show up on your menu bar  (phrases with spaces are allowed, some special characters may not be).

Enter the URL which should be opened when someone clicks on the new menu-bar item   (make sure the web-site address starts with http:/  )


Click Save

You can change the order of the items in your menu bar by picking them up using the "grab bar" to the left of the item name, and drag-and-dropping them up or down the list of menu-bar entries.


When your menu-bar items are in the right place, click Save Arrangement in the top right corner of the window.


What your readers see ...

Visitors to your blog will see a menu bar either at the top or the side depending on where you put your pages gadget.

Most readers will think that the items in your menu bar will take them to "pages" in your blog.   Iif they hover over an item in the bar, they will see the web-address it is linked to, in the same way that their browser usually shows this   (eg in Chrome, I see it in faint text at teh bottom left of the screen).

This will work well if the web-addresses you have added are within your own blog (eg search-labels, if you are using this approach to putting your posts into pages).

But it may be confusing if you've put in links to other websites, or invalid links   (remember, there was no "test this link" option when you were adding the web-site URL to link to).

Currently I do not know any way to make pages-gadget links to external websites open in a new browser window.    (If you know a way, the comments area is just below - please share!)


The Pages-gadget vs a Link-list

When the Pages-gadget was first introduced, they were just like regular linked-list:   the magic was that Blogger introduced a new area in the templates where linked-lists are formatted differently.

This is still true to a great extent.   But on blogs viewed with dynamic templates, the presence of a Pages gadget causes the layout to be a little different.  

I haven't tested it thoroughly, but I suspect that the presence of a link-list gadget on the template (remember, you cannot currently add gadgets to dynamic template blogs)  would not have the same effect.  

This makes me suspect that Blogger may introduce some other enhancements based on the Pages gadget, so it may be worth using them instead of Link-list gadget in the future, so as to get the benefit of these changes when they eventually happen.


Related Articles:


Putting your posts into Pages

Making your links open in a new browser window or tab

Adding a search tool to your blog

Adding gadgets to dynamic view blogs

Blogger'sPages are more trouble than they're worth

The difference between posts and pages

What are dynamic blog templates?
Read more > The Page gadget: a menu bar for your blog, with links to just about anywhere

Thursday, May 5, 2011

Posts, Pages and navigating inside your blog

This article explains Posts, Pages, and some ways that they can be used to help people move around inside your blog.

Overview:
Since Google introduced the new Pages feature, there has been a lot of confusion about Posts, Pages, Sub-pages, and how to categorise things.

This isn't helped by a lot of Blogger's own documentation, written before the Pages feature was introduced, which used the term "pages" to refer to a collection of Posts.

This article explains the difference, and looks at when each type of item should be used.


Pages vs Posts

A Post is the basic unit of information that you publish in Blogger.  Each post has a post-date, and this date is often the main tool for navigating around your blog.

On the surface, a Page is similar to a Post.  But really, they are quite different, and should be used for different things.

Pages are meant for static content that doesn't change often.  This is content that supports your main content, which is in your posts.   Because of this, Pages:
  • Cannot be set as your home page
  • Cannot be navigated to from the Newer/Older posts links
  • Don't have labels, 
  • Can only be navigated to from the Pages gadget - cannot be navigated to from the Labels gadget
  • Are not included in RSS feeds, 
  • Are not included when you export your blog contents,
Ideally, you should only edit your Pages very rarely.


Navigating around a Blog

When the Pages gadget is displayed as a horizontal bar, it looks like a menu bar.


This makes many people think that Pages are the main way of navigating around a Blog.  This wasn't true, initially, but recent changes to the Pages gadget have made it more helpful.   That said it's not the only - or best, IMHO - way to get your users navigate.

The tools that Blogger provides for navigating around a blog are:
  • The Labels gadget (to list posts by category) - you can use it to make it seem like you have put your posts into "pages"
  • The Archives gadget (to go directly to a post by date)
  • The Newer/Older posts links (to go through the blog one screen at a time)
The Linked List gadget can also be used for navigation, provided you set it up with links to Posts in your blog.  

And you can put links between individual Posts using regular hyperlinks (select the text, cick the Link item in the toolbar, put in the URL of the post that you are linking to).

The Pages gadget is not intended for navigating through most of the contents your blog - it is only useful for getting directly to reference information that isn't stored in the same sequence that your main blog contents are.


Related Articles: 


Blogs, Blogger, blogger, Post, Pages and  Labels - some basic definitions

The difference between Posts and Pages

Why Blogger's "static" pages are more trouble than they're worth

Categorising Items in your Blog

Putting your posts into "pages"

Jump Breaks and Posts
Read more > Posts, Pages and navigating inside your blog

Tuesday, April 26, 2011

How to put put Posts into your Pages in Blogger

This article shows how to set up your blog, using Blogger, so that it looks like your posts are on separate web-pages.


Can you put Posts onto Pages in Blogger?

Ever since Google introduced "pages" into Blogger, people have complained that their posts all go onto the "home page", and asked how to put posts onto different pages in their blog.


The standard, but unsatisfactory, answer is
"Sorry, that's not how Blogger works.   So called "static" pages in Blogger are meant to be used for reference information that doesn't change often, which you don't want to be part of your regular post-feed, but which you do want users to have easy access to."

Basically, this is part of the difference between post and pages.

Luckily it's easy to set up your blog so that it looks like your posts are on different pages [tweet this],

.... even though you and I know that this isn't how Blogger works.

The only aspect that some people don't like is that their posts all show up on the "home page" was well as the topic pages, but even this can be worked around, at least sometimes.


Follow these steps:

1  Categorise your posts by adding Labels to them.


2  Make a "pages look alike" menu bar:  

There are (at least) are three ways of doing this - choose which ever one suits your blog best:
a)   With a Labels Gadget:    
Use the usual add-a-gadget approach to put a Labels gadget into the spot where you would put the Pages gadget if you wanted to make a horizontal menu bar with it.

If your blog has some Labels that you don't want to have "pages" for, then set it to show only some of your Labels:

         b)   With a Linked-list gadget:   
Use the usual add-a-gadget approach to put a Link-list gadget where you would put the Pages gadget if you wanted to make a horizontal menu bar with it.
Add a link to the list for each Label that you want a "page" for.   The HTML to use for each Label value is

http://YOUR-BLOGS-URL/search/label/THE-LABEL-NAME

You can also add other items (eg individual Posts, or even Bllogger's static "pages" if you really must have them - see why I don't like them!) - see the menu bar at the top of this site for an example of this.


c)   With a Pages gadget:   

Use the usual add-a-gadget approach to put a Pages gadget into the menu bar area.
Use Label-links described above the Linked-list gadget option, as website links to add to your Pages gadget.


3   If you don't want all posts to appear on the "home page" was well as the topic pages, set your home page to show zero posts, by setting  "Number of posts on main page:" = 0   on:

Post-Sept-2011-Blogger (aka the new interface)   Layout  > Blog Posts (edit),
Pre-Sept-2011-Blogger (aka the new interface)     Design > Page Elements > Blog Posts (edit)


Alternatively, you could use a technique similar to Showing a Gadget only on the Home Page  to not show the Blog Posts gadget on the home page.  the condition to use is !=  instead of ==)   If you do try this, then I strongly recommend that you consider the various options for giving your blog a home page, and make sure you accept the disadvantages of editing your template.


Job Done

It really is that simple.  Your readers can now click on the "pages" in your blog from a "menu" at the top, and see a list of posts for the Page that they chose.   Even better, if some posts relate to more than one topic, they show up on both of the relevant pages.

Don't forget to test your blog, to make sure that the menu bar is working how you expect it to and that it looks OK, in all the browsers that your readers are actually using.


I'm keen to hear if this approach works for you.
  • It is a "good enough" alternative to "real pages"?
  • Are there any other side-effects of using Labels to "pretend" to be web-page titles?
Please leave your thoughts in the comments box below.


Related Articles: 


Using Labels to group your Blogger Posts

Adding external and internal URLs to your pages-gadget / menu bar

Giving your blog a home page

The difference between posts and pages

Showing a Gadget only on the Home Page
Read more > How to put put Posts into your Pages in Blogger

Monday, September 13, 2010

Blogger's "static" Pages are more trouble than they're worth

Blogger's "static" or stand-alone pages have some benefits - but also a number of disadvantages.   Use them sparingly!


Overview:

Previously I've described the Pages feature that Blogger introduced in February 2010, and the differences between Pages and Posts.

There are times when stand-alone Pages are a handy feature.

But overall I've decided that the disadvantages are a lot greater than the advantages.  From now on, any blogs that I work on will get horizontal menu bars made from Link-list gadget, or perhaps just menus made with HTML, and the vast majority of content will go into Posts not Pages.

Here's why.


The Page title is the Menu-bar value

When you create a page (Edit Pages > New Page), you can
  • Give it a title, 
  • Write the content, 
  • Allow viewer comments or not
  • Handle <br />'s (or not)
  • Say whether any HTML in the page is interpreted (ie used to control the display), or displayed (the code vales, not their effects, are always shown).
Blogger has standard rules for how the items that you enter are turned into HTML.  In particular, the Page-title (and Post-title too) is given a H3 (header three) tag.   And this particular tag is very important to the search-engines, so bloggers who care about whether the search-engines find their blog or not pay quite a bit of attention to the words in the title.

The problem is that the Page title is also the value that's put on the menu bar if you are giving access to your Pages with the Pages-gadget (and most people are):


That's ok, if you use only a short-ish titles.

The HTML behind the Pages gadget used an un-ordered list:  this it what lets it display horizontally if it's in the header, and vertically if it's in the sidebar.   But when it's horizontal, if the values are longer than one line then it simply spills onto the next line.   This can happen if a viewer had a low screen resolution - or if you've used lots of search-engine friendly key-words in the Page-titles:


And there's the crux of the problem:  since the Page-title is the H3 header, it needs to be long and descriptive to give the search engines a good chance of finding your page.  But make it long, and the Pages gadget looks awful, and is confusing for viewers.

Of course I could use Pages, and build a menu-bar to access them using a linked-list gadget (or even just HTML for a table).  But if I'm doing that, it's just as easy to make the menu-bar "items" out of Posts as it is from Pages - and using Posts avoids the disadvantages which Pages have (eg not included in the RSS feed, no Labels, etc).


Other problems:

There are some other problems with Pages, including:

An unclear name:  
Blogger decided to call the feature that they introduced "Pages".  Most help-article writers outside of Google used the phrase "static pages", to make a clear distinction between these new "pages" and the existing main page, layout-page, archive-page (not to mention the way that "page" refers to a screen in most websites).  But there are still dozens, maybe hundreds, of official help articles from Google, and unofficial ones from the rest of us, that refer to "Pages" in the older screen-full-of-text sense.

User confusion: 
New Blogger users see Pages, and assume that it's possible to put blog-posts onto the individual pages, just like you can put content into pages in other websites.   Some spend a lot of time looking for ways to do this - time which IMHO would be better spent just adapting to Blogger's way of working, or moving to another tool that has native support for classical web-pages if that's what they really need.

RSS Feed: 
Pages aren't included in a blog's RSS feed - a new page is not notified to Followers or feed-subscribers.

Backups: 
When the feature was first introduced, Pages weren't included in exported blog-content files.  So the only way to back them up, or even transfer them to another blog, was to manually copy the contents.   (This feels like the sort of thing that Google might quietly fix - I haven't tested to see if they have or not.)

No label or date:
Static-pages don't have Labels or dates, so there's no way for them to be included in the display shown on Archive or Label pages. This also confuses some readers.  It also means that a Page can never be used as the target page for any of the standard tricks that can be used to give your blog a "home page".


Conclusion:

None of the other problems were enough to make me stop using Pages.

But the combined effect of the SEO / header-display problem and all the other issues means that I now believe that
"Static-pages are trouble than they're worth."
I'll still use the page-gadget area in designer templates to make my own horizontal menu bar, because I rather like the way that linked lists are formatted in most of the templates.  I might even make it look like I've put posts into pages using this menu.   And I'll happily use Pages to display the results of Google Custom Searches (since there's no need for these to be fed, backed-up etc)

But I won't be pointing to any new stand-alone pages made with the Posting > Edit Pages menu.


Related Articles: 


Blogger's Static-Pages feature

Putting Posts into your Pages

Google Custom Searches - putting one into your blog

The differences between Pages and Posts

Blogs, Blogger and bloggers; Post, Pages and Screens:  some basic definitions

Giving your blog a "home page".
Read more > Blogger's "static" Pages are more trouble than they're worth

Friday, August 27, 2010

Displaying a gadget only on static pages - or on everything except static pages

This article is about how to set up a gadget / widget in Blogger so that it is only visible on the "static" pages in your blog.

Note:  in Blogger, the words "gadget", "widget", and even "page-element" all mean the same thing - basically a bit of code that can be put into your blog without looking like code, and which does a specific thing.

I generally use "gadget", because the Page Elements tab currently says "Add a Gadget".  But they're absolutely the same.


Making a gadget that only shows on static pages:

1   Make the gadget
Do this in the usual way, using Design >  Page Elements > Add a gagdet.


2   Drag-and-drop the gadget to the place where you want it.
A popular place for a gadget that is going to look like a "home page" is in the Body section, just above the Blog Posts gadget, where "Test Gadget" is in this example:


3  Edit the Gadget again


Don't make any changes to it - just maximise the window, so you can see the WidgetID, which is at the very end of the address bar at the top.


Make a note of the value.   (In this example, it's Text1).


4  Find the code for your gadget and edit the template:


Edit your template  (Design > Edit HTML)

Download a copy of the template, and put it somewhere safe.

Use your browser's text search tool (Edit / Find in Firefox) to look for the widget name that you noted in step 3.  Notice what comes after it.   In this example, it's the line for Blog1:
          <b:section class='main' id='main' showaddelement='no'>
<b:widget id='Text1' locked='false' title='Test gadget' type='Text'/>
<b:widget id='Blog1' locked='true' title='Blog Posts' type='Blog'/>


Click the checkbox (so it's turned on)

After the expanded template has downloaded, find the widget name again.  This time it will look a bit longer (the exact details depend on what type of widget/gadget it is.)

  <b:section class='main' id='main' showaddelement='no'>
<b:widget id='Text1' locked='false' title='Test gadget' type='Text'>
<b:includable id='main'>
  <!-- only display title if it's non-empty -->
  <b:if cond='data:title != &quot;&quot;'>
    <h2 class='title'><data:title/></h2>
  </b:if>
  <div class='widget-content'>
    <data:content/>
  </div>

  <b:include name='quickedit'/>
</b:includable>
</b:widget>
<b:widget id='Blog1' locked='true' title='Blog Posts' type='Blog'>

5   Add conditional formatting:
You need to put conditional formatting code around the code for the gadget - makings sure that it doesn't go around the code for anything else!  (which is why you noted what comes afterwards in step 4)

The code to use is:
<b:if cond='data:blog.pageType == "static_page"'>
THE CODE FOR YOUR GADGET GOES IN HERE

</b:if>

The example above looks like this, when the code has been added:
          <b:section class='main' id='main' showaddelement='no'>
<b:widget id='Text1' locked='false' title='Test gadget' type='Text'>
<b:includable id='main'>
  <b:if cond='data:blog.pageType == "static_page"'>  <!-- only display title if it's non-empty -->
  <b:if cond='data:title != &quot;&quot;'>
    <h2 class='title'><data:title/></h2>
  </b:if>
  <div class='widget-content'>
    <data:content/>
  </div>

  <b:include name='quickedit'/>
</b:if></b:includable>
</b:widget>
<b:widget id='Blog1' locked='true' title='Blog Posts' type='Blog'>

ALTERNATIVE:
If you want the gadget to appear on every page except static pages, use is

<b:if cond='data:blog.pageType != "static_page"'>
THE CODE FOR YOUR GADGET GOES IN HERE
</b:if>
See the slight difference:    !=     instead of   ==


NOTE:  
Copy and paste is the best way to transfer the code.  If you must type it in yourself, be very careful about what's a single quote mark and what's a double quote mark.


6  Check that it's worked
Preview your blog before you save the changes:  check that the the widget is visible.

Save the template changes, and look at your blog.  Check that
  • The widget is, or is not, on static pages (depending on what option you chose)
  • The other elements of your blog (other widgets, blog post titles, dates and contents) are all as you expect them - on the first screen, and on other screens too.

If anything is wrong with how your blog is working, go back to the template editor (Design > Edit HTML), and upload from the copy of your template that you made at the beginning of step 1.   This will let your blog work properly, while you figure out what went wrong.


Related Articles: 


Static Pages in Blogger

Controlling what goes on the homepage

Showing a gadget only on the home-page.
Read more > Displaying a gadget only on static pages - or on everything except static pages

Tuesday, April 6, 2010

Blogs, Blogger, bloggers, Posts, Pages and Screens - some basic definitions

This article defines some of the basic words if you are using Google Blogger.  It is helpful if you are just getting started, and need to accurately describe a problem you are having.   It is part of a series of articles about getting started with Blogger.


Google, Blogger and Blogging, Posts

Pied-billed Grebe 0561Google, the noun, (sometimes called Google Inc or Google Ltd) is a company.  They became famous by creating a very, very useful search engine.  Since then, as well as making the search engine even better, they've created (or purchased) lots of other tools as well, and become rich by selling on-line advertising space inside their tools.

Using their most-popular tool (www.google.com or your local version eg www.google.co.uk), you can google (a verb), ie search, for things.    (The same way that you can hoover the floor, or xerox a piece of paper

A blog is a "binary log" - geek-ese for "a diary you keep on the internet".   A blog can contain anything you want to write, for example:
  • a fantasy story that you made up, 
  • a factual account of your life, 
  • your opinions about politics
  • newsletters from a club you belong to
  • information about your business and the services you offer
  • and many many more

Blogger is a piece of software (ie a computer program) provided by Google, which lets you create a a blog.

A blogger (small b) is a person who writes a blog.  They may use Blogger, or various other types of blogging software (eg WordPress, TypePad)

A Post is the basic item that you publish onto your blog.   After you have been blogging (writing a blog) for a while, you blog will (usually) have many Posts.


Pages - AKA Static Pages

In regular websites, a page is roughly the same as a screen (at least as far as anyone who reads this article needs to know).

Until recently, most documentation about Blogger talked about Pages as through a Page was something that showed one or more Posts.  (More about these soon.)

However Google introduced a new feature, called Pages, into Blogger in early 2010.

These Pages are intended for bloggers who want some material on their blog which is slightly different from the rest:  it's not part of the usual material that they publish, and stays current and relevant in a way that older posts in a blog don't.   Typical pages content includes contact-details, frequently-asked-questions, or "about this blog" statements.

Pages are edited using a tool that is similar to the Posts editor, but they have some small differences:  eg they don't have a publication-date so they don't appear in the Archive.  I have previously written a full description of the difference between Pages and Posts.

Pages also have a gadget all of their own (called the Pages Gadget), which can be used to give a "menu bar" at the top, or bottom, or in the sidebar of your blog.   

A key difference between regular websites and blogs is that Posts don't go onto Pages:  all your Posts go onto what feels like the "main page", and the other pages are for reference materials only.   There are ways around this, eg using labels to categorise your blog, and making it look like you have put posts into pages by making a horizontal linked-list of label-search statements instead of the standard pages gadget, but even this isn't quite what many people expect.

Some people refer to Pages as Static-pages, to try to avoid the confusion.  I don't use that term because:
  1. It's not the term that Google/Blggger uses, and
  2. Some of the target information (eg contact details for a club) is not static - it could change many times over the life of the blog.

    Templates and Collections of Posts

    A Template is a control file that says how a Blog will look.  Blogs that are about different topics may use the same template:  their content will be different, but they will look very similar to a person who reads them.

    I have recently started using Screen to refer the display that Blogger generates each time that someone looks at your blog.

    A Posts Screen may show 1,2, 3 or even dozens of Posts.   The number of posts shown is controlled by an option that the blogger sets (in either the Design > Page Elements > Blog Posts, or Settings > Formatting options) and by a (relatively new) feature called auto-pagination, which restricts overly large collections of Posts, so that Blogger works more quickly overall.
     
    If a Blog has a Layout or Designer template (see Types of Blogger template), then there are links near the end of each screen for Newer Posts and Older Posts:  clicking them take the user to a new Screen, which shows a set of newer or older posts.

    There are other types of Screen also:
    • If a blog has a Labels gadget, then clicking as option in it opens a List of Posts screen showing all published Posts in the blog that have the corresponding Label.
    • If a blog has an Archive gadget, then clicking an option in it opens a List of Posts screen showing all published Posts in the blog that were published in that time period.


    Related Articles: 


    Getting started with Blogger

    The difference between Pages and Posts

    Types of Blogger template

    Using labels to categorise your blog

    Making it look like you have put posts into pages.
    Read more > Blogs, Blogger, bloggers, Posts, Pages and Screens - some basic definitions

    Friday, February 26, 2010

    The Difference Between Pages and Posts

    This article is about the difference between Posts and Pages in Blogger, and suggests an alternative way to back up your page contents that are not included in regular backups.


    In Feb 2010, Blogger introduced the Pages feature: this gives you a way to make some of your "postings" special, and to have a link to them from either a menu bar in the header or a link-list in the sidebar (using a gadget that is provided for this, and integrated with the Pages editor).

    Some people call them "Static Pages", because one use for them is to contain reference information that doesn't change often and which shouldn't ever be on the top of your blog  (unlike regular posts which are "dynamic" and regularly have now content added to them.).

    Google's explanation of Pages is here.


    What's special about pages:

    Initially, I thought Pages were just special cases of Posts, without a publication date.  That's true, but they have some more features, some of which I didn't expect.   Here is everything I've noticed so far:

    1 You edit them through a separate option on the Blogger dashboard

    When you go into the Pages option, the list of Pages, isn't quite the same as the list of Posts.

    Pages that are already published have a blue background, and a View link in the Edit Pages tab.
    Pages that are draft have a grey background and the word "draft" underneath them, and no View link

    You can have more than one Page with the same title (even though this looks silly on your blog).
     

    2 Pages don't have a date associated with them.

    • They aren't listed in your Archive gadget,
    • They cannot be accessed using the New Post / Older Post links.
    • They aren't included in any RSS feeds from your blog

    This means that you need to use either the Blogger-supplied Pages gadget, or another gadget (HTML, link-list, etc) that you set up to include links to your pages.   If you don't, then there is no way that readers will be able to get to your Pages.


    3 Only one Page is shown at a time

    Because of this, the jump-break feature isn't implemented in the Pages editor, and any jump-break that you manually put into a Page (using the <!-- more --> HTML code) is ignored when the Page is displayed.


    4 Pages don't have labels

    So they won't be included if you use the Labels gadget


    5 Pages aren't included when you export your blog

    On the Settings tab, there is a tool for exporting and importing blog contents.   Pages are not included in the file created by the export option.

    If you want to take a back-up copy of your pages, you need to move the code for each one individually.

    (I think that this was probably an oversight or defect, it wouldn't surprise me if Google quietly fix it sometime soon.
    UPDATE:  I've heard a rumour that this has been changed and that pages are now exported, but aren't automatically published when you import from that file.  still to confirm if it's true or not.)


    6 Pages cannot be set as your home page

    By default, your "home page" shows the Post with the latest Post-date.  There are various ways around this.  And now the best one (see the top of that article) lets you use a Page as your home-page.


    7  Pages are not included in RSS feeds

    So they are one way to sharing information that you want to stop notifications to your subscribers about.


    8 The Amazon product-finder isn't shown on the page-editor.

    This was one of my initial observations back in 2010 - since then, the end of Blogger / Amazon integration has removed the product editor from the post-editor totally.


    9 The Pages editor is the "new editor" only: you do not have the option to use the old editor for them.

    This was another observation back in 2010 - it's since become obsolete because the old editor isn't available any more in the "new" Blogger software (first piloted Sept 2011, became compulsory for all users in Sept 2012).

    10   Other missing options.

    You cannot set a perma-link, or enclose links in the title of Pages.


    11    Pages don't even have to be "post-like"

    Initially, "pages" had to be like mini-posts.   But now they can simply be a menu-bar entry link, pointing to some other web-address - and so this gives you access to a clever way of putting posts into pages.


    Related Articles:


    Putting Posts into your Pages

    The Pages gadget - a menu bar for your blog

    Converting Posts into Pages

    Displaying a gadget on static pages only

    Finding the URLs for your Pages

    Blogs, Blogger and bloggers, Posts, Pages and screens:  introducing Blogger
    Read more > The Difference Between Pages and Posts

    Finding the URL of a Page

    You can easily find the URL of the Pages in your Blog, even if you haven't used the Pages gadget supplied by Blogger.


    Navigating Pages in Blogger

    Previously I've described the so-called "static" pages feature that Blogger introduced. This lets you create up to 10 stand-alone pages.

    Blogger intended your visitors to access these pages using the Pages-gadget, which contains a link to the Pages you choose to show in it.

    But many people would prefer to make their own navigation gadget / menu-bar, which has inks to a number of different pages, posts and labels in the one gadget.   And to do this, they need to find out the URL of each Page (etc) that they want to include.


    Finding the URL of a Page

    From the Blogger Dashboard, choose the Posting > Edit Pages tab.

    For each Page that is listed, either:
    • Right-click on the View button for the page, 
    • Choose Copy-link-location (or similar the specific command - depends on your browser)
    OR
    • Click on the View button, to open the page:  
    • Copy the URL from your browser's address bar.


    Related Articles: 


    The Difference Between Pages and Posts

    Static pages in Blogger

    Blogger's static pages are more trouble than they're worth

    Putting posts into your pages in Blogger

    Finding the URL of a picture in Picasa-web-albums

    Copying a post from one blog to another
    Read more > Finding the URL of a Page

    Friday, February 5, 2010

    Converting Posts into Pages

    This article looks at how to make an existing Post into a Page, using the Pages feature introduced in Feb 2010.  It is is part of a series about the Pages feature in Blogger.


    Overview:

    There is no automatic way to convert one of your existing Posts into a Page:  you simply need to do each one individually - if you really want to use pages at all.

    In short, you need to copy the title contents into the "Page Title" field, and go into Post Options and check that the comments option is correct.

    The best way to ensure that the Page looks exactly the same as the Post did is to copy and paste the HTML for the page contents.  The steps to follow to do this are listed here.

    Note that this is quite different from (making it look like you have) displayed posts inside your pages.  And that there are some important differences between pages and posts.


    How to convert a Post into a Page

    1. Go into the Posting / Edit Posts tab, and edit the post that you want to convert.
    2. When the post-editor opens, choose Edit HTML mode (currently in the top right hand corner)
    3. Check the Post Options values:  set Edit HTML Line Breaks to "Use <br /> tags"
    4. Select all the contents of the of the editor window (click in it and press Ctrl/A), and Copy them.
    5. Choose the Posting / Edit Pages tab
      (Press Ok if the system asks if you want to leave the page without saving)
    6. Click New Page., or select a page that you've already created.
    7. When the page-editor opens, enter a title.
      This is what shows up on the Pages menu, and in the Title field inside the blog if you're showing it.
    8. Check the Post Options values:  comments and backlinking if you want them, interpreting vs just showing HTLM, and also set Edit HTML Line Breaks to "Use <br /> tags"
    9. In the editor, choose Edit HTML mode (top right hand corner)
    10. Paste the contents that you copied earlier
      Usually done with Ctrl/V, or Edit/Paste from the browser menu:  this puts the contents from Step 3 into the Page.
    11. Choose Publish Page
    12. Choose an option for how you want the Pages Gadget to appear
    13. Press Save and Publish.
    14. View your blog, and make sure that you are happy with the new page.
    15. Optional:   Go back to Edit Posts, and Delete the post that you have converted.  (If you don't delete it, remember that you now have the contents in two separate places:  the original Post, and the new Page).


    Related Articles:


    Making it look like you have displayed posts inside your pages

    Blogs, Bloggers and Blogger; Post, Pages and Navigation - some basic concepts

    Blogger's "Static Pages" are more trouble than they're worth

    The difference between Post and Pages.

    Showing a gadget only on static pages

    Series overview:  Pages in Blogger  
    Read more > Converting Posts into Pages

    Making sub-pages

    This article is about making so-called sub-pages in Blogger.


    Blogger and Pages


    Hoagie Hero Sub Sandwich
    Since Blogger introduced Page, people have been asking "how do I put my posts into pages" and "how do I make sub-pages.


    It's not always clear what the second question means.  


    In some cases, it's about making sub-menus.  This isn't something that Blogger supports, although there are work-around.   I haven't  explored  them yet, but check the Blogger-Helpers-Search, there are lots of people who've described ways to do it.


    In other cases, it's simply want other posts or pages being pointed to from the first page, and this is simple enough: just edit he Page, and use the Page-editor to make a link to anywhere you want.  


    If the place that you're linking to needs to be a Post (because you are only allowed 10 Pages, and there is no way around this limit), then you may want to give it a post-date that is in the past (set the date under Post Options).


    Related Articles:


    Putting Posts into your Pages in Blogger


    The difference between Pages and Posts


    Changing the date of a  Post


    Static pages are more trouble than they're worth
    Read more > Making sub-pages
     
     
    Copyright © blog
    Blogger Theme by Blogger Designed and Optimized by Tipseo